Automated Device Provisioning: Zero-Touch Setup Across Windows, Apple, and Android
For decades, setting up a new work device meant the same laborious ritual: the machine shipped to IT first, a technician spent hours building a “golden image” and installing software, and only then was the configured device re-shipped to the employee.
- Content owner
- Insyto Content Team
- Editorial reviewer
- Ritesh Mhatre
- Technical reviewer
- Navish Ansari
- Next review
- To be scheduled
- Last reviewed
- Review pending
- Technical level
- Intermediate · IT directors, endpoint administrators
Executive Summary
For decades, setting up a new work device meant the same laborious ritual: the machine shipped to IT first, a technician spent hours building a “golden image” and installing software, and only then was the configured device re-shipped to the employee. It was slow, expensive, and — with remote and hybrid work now the norm — increasingly unworkable, because the person who needs the laptop is rarely in the same building as the technician. Automated device provisioning, often called zero-touch provisioning, eliminates that ritual entirely. It lets a brand-new device configure itself the moment the employee first signs in, with IT never physically touching it. The device leaves the factory, and the first person to open the box is the employee who will use it.
The mechanism is straightforward once understood: register a device with a provisioning service one time, and from then on, the first sign-in triggers the entire configuration automatically. The device joins the organization’s identity, enrolls itself in the mobile device management (MDM) platform, and receives its policies, applications, and security baseline — arriving productive, compliant, and secured on day one, in under an hour, anywhere in the world. Crucially, this is not a Windows-only trick. Every major platform offers a zero-touch provisioning service — Windows Autopilot, Apple Automated Device Enrollment through Apple Business Manager, and Android zero-touch or enterprise enrollment — all managed through a common MDM control plane. Learn the pattern once, and it applies across a mixed fleet.
This guide explains automated device provisioning as a cross-platform discipline. It contrasts manual imaging with zero-touch, walks through the provisioning flow, shows how the same concept is delivered by the tool for each platform, sets out the four building blocks that must be in place first, and covers the best practices that make provisioning fast, consistent, and secure. The payoff is significant: dramatically faster onboarding, a consistent and secure build every time, no imaging infrastructure to maintain, and the ability to equip a remote workforce as easily as one down the hall.
Ship It Ready: The End of Manual Imaging
The value of automated provisioning is clearest in the before-and-after. It replaces a hands-on, sequential process with one where the device does the work itself.
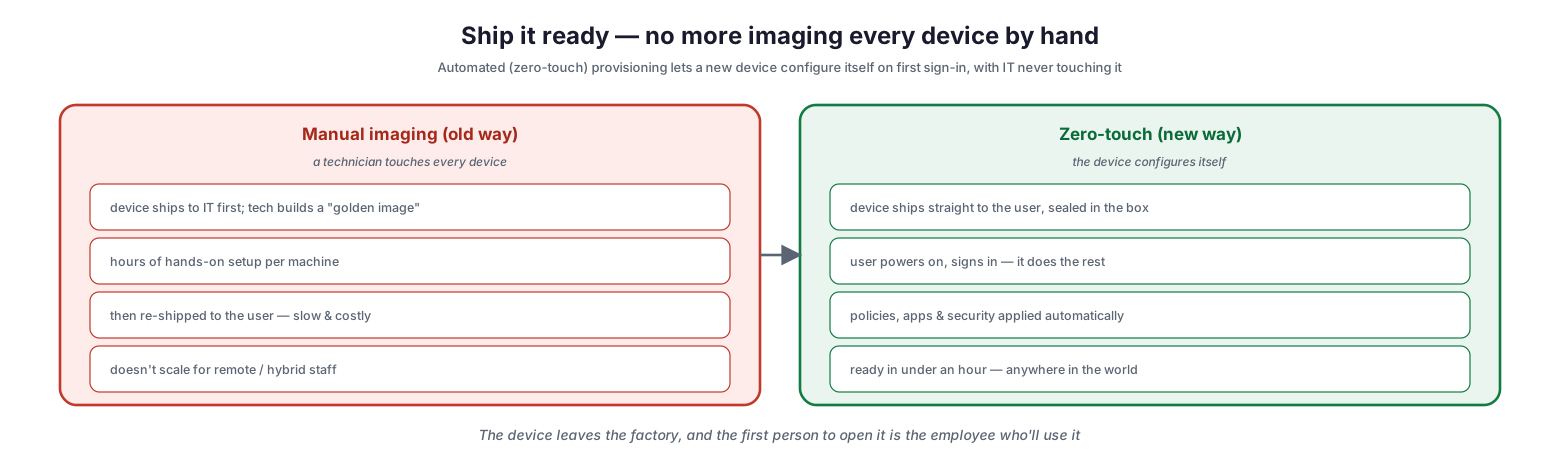
Ship it ready — no more imaging every device by hand
In the manual imaging model, a technician touches every device: the machine ships to IT first, a technician builds a golden image, spends hours on hands-on setup per machine, and then re-ships it to the user — slow and costly, and impossible to scale for remote or hybrid staff. In the zero-touch model, the device configures itself: it ships straight to the employee sealed in the box, the user powers it on and signs in, and it does the rest, applying policies, apps, and security automatically and becoming ready in under an hour, anywhere in the world. The transformation is not merely faster imaging — it removes IT from the physical path entirely. The device goes from the factory to the employee, and the first human to open it is the person who will use it. That single change is what makes equipping a distributed workforce practical, and it is why zero-touch provisioning has become the standard for modern device onboarding.
How Zero-Touch Provisioning Works
The process behind the magic is a one-time registration followed by an automatic sequence triggered by the user’s first sign-in. Understanding the flow clarifies what has to be set up and what happens on its own.
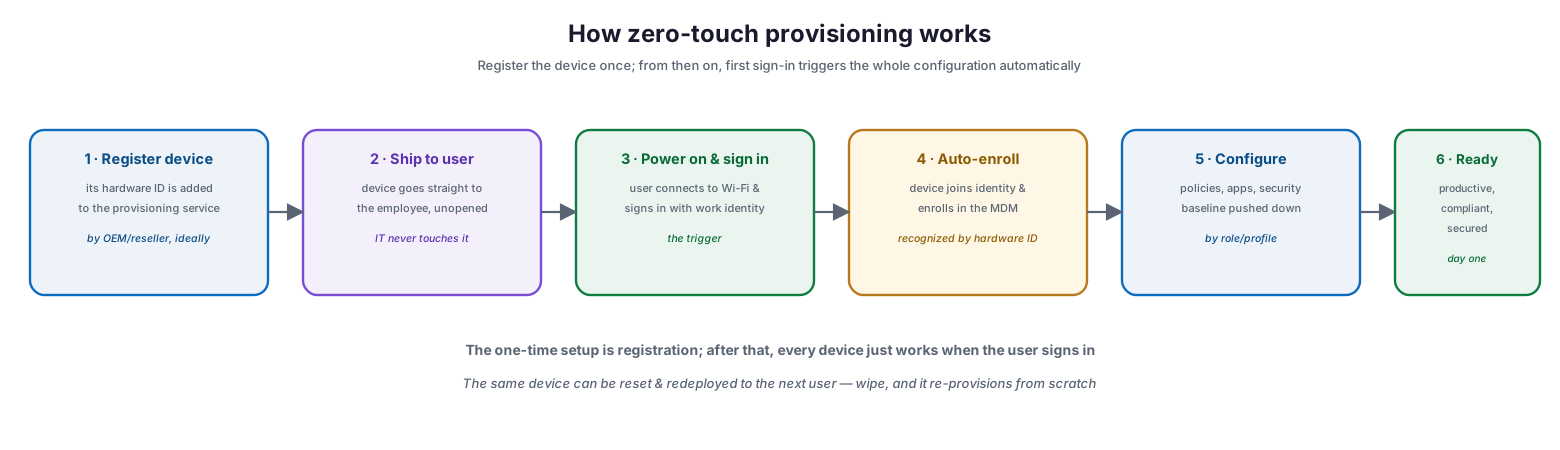
How zero-touch provisioning works
The flow runs through six steps. First, register the device — its hardware ID is added to the provisioning service, ideally by the OEM or reseller at purchase. Second, ship to the user — the device goes straight to the employee, unopened, with IT never touching it. Third, power on and sign in — the user connects to Wi-Fi and signs in with their work identity, which is the trigger. Fourth, auto-enroll — the device, recognized by its hardware ID, joins the organization’s identity and enrolls in the MDM. Fifth, configure — policies, apps, and the security baseline are pushed down according to the user’s role or profile. Sixth, ready — the device is productive, compliant, and secured on day one. The only one-time setup is registration; after that, every device simply works when the user signs in. And the same mechanism runs in reverse for reuse: a returned device can be wiped and redeployed to the next user, re-provisioning from scratch with no manual effort.
| Step | What happens | Who/what does it |
|---|---|---|
| 1. Register | Hardware ID added to provisioning service | OEM/reseller (ideally) or IT |
| 2. Ship | Device sent straight to the user | Vendor / logistics |
| 3. Power on & sign in | User connects and signs in | The employee |
| 4. Auto-enroll | Device joins identity, enrolls in MDM | Automatic (by hardware ID) |
| 5. Configure | Policies, apps, security applied | MDM (by role/profile) |
| 6. Ready | Device is productive and secured | Day one |
Same Idea, One Tool Per Platform
A common misconception is that zero-touch provisioning is a Windows feature. In fact, every major platform provides its own provisioning service delivering the same self-configuring experience, and all of them can be managed together.
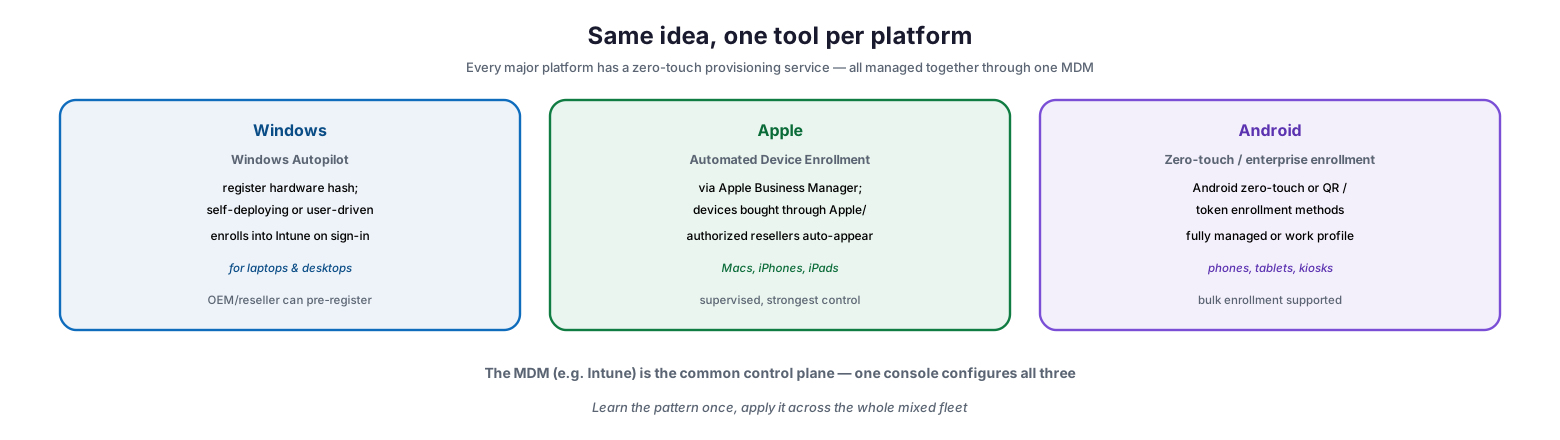
Same idea, one tool per platform
For Windows, Windows Autopilot registers the device’s hardware hash and provides self-deploying or user-driven modes that enroll the device into Intune on sign-in — for laptops and desktops, with OEMs and resellers able to pre-register. For Apple, Automated Device Enrollment through Apple Business Manager means devices bought through Apple or authorized resellers automatically appear in the organization’s account — for Macs, iPhones, and iPads, supervised and offering the strongest control. For Android, zero-touch enrollment or QR and token-based enterprise enrollment methods provision phones, tablets, and kiosks as fully managed devices or with a work profile, with bulk enrollment supported. The unifying element is the MDM: a platform such as Intune serves as the common control plane, so one console configures all three. This means an organization can learn the provisioning pattern once and apply it across its whole mixed fleet, rather than mastering three unrelated processes.
| Platform | Provisioning service | Devices |
|---|---|---|
| Windows | Windows Autopilot | Laptops, desktops |
| Apple | Automated Device Enrollment (Apple Business Manager) | Macs, iPhones, iPads |
| Android | Zero-touch / enterprise enrollment | Phones, tablets, kiosks |
| All | Managed through one MDM (e.g. Intune) | Whole mixed fleet |
What You Need in Place First
Zero-touch provisioning is not something that simply switches on; it rests on four building blocks that must be prepared before rollout. Getting these ready is the real work.
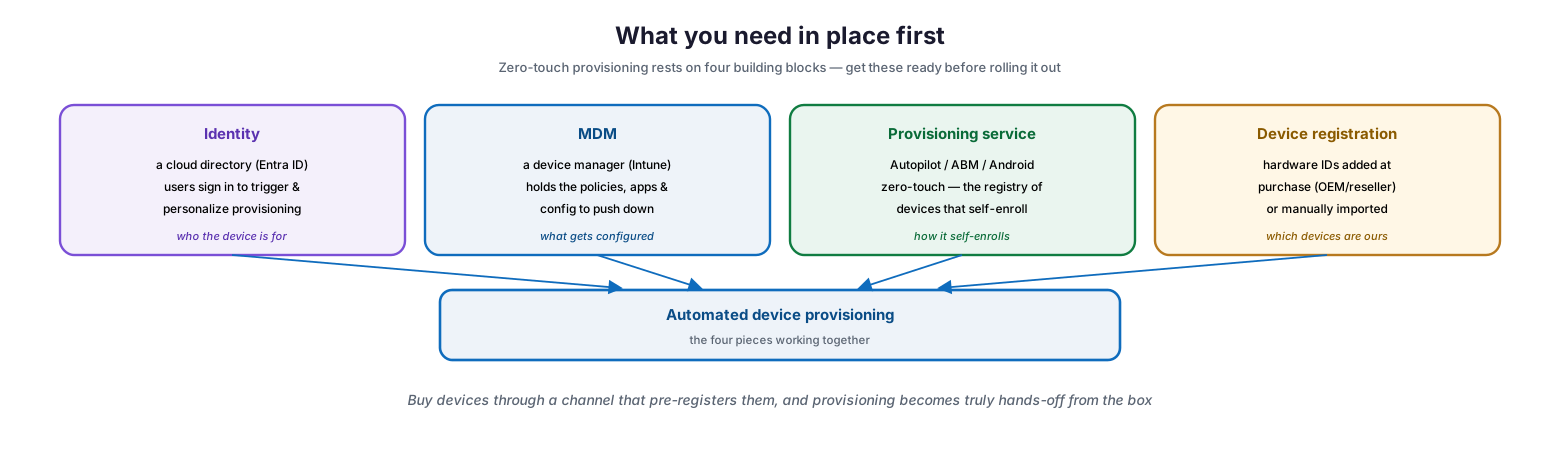
What you need in place first
The four components are: identity — a cloud directory such as Entra ID, because users sign in to trigger and personalize provisioning, establishing who the device is for; MDM — a device manager such as Intune that holds the policies, apps, and configuration to push down, defining what gets configured; a provisioning service — Autopilot, Apple Business Manager, or Android zero-touch, the registry of devices that self-enroll, determining how the device self-enrolls; and device registration — the hardware IDs added at purchase by the OEM or reseller, or imported manually, establishing which devices are ours. Together these four make automated provisioning work. The single most impactful decision is the last one: buying devices through a channel that pre-registers them automatically, so provisioning becomes truly hands-off from the box, with no manual capture of hardware IDs. When that is in place, the entire process from order to ready-to-use requires no IT touch at all.
| Building block | Role | Example |
|---|---|---|
| Identity | Who the device is for; triggers provisioning | Entra ID / cloud directory |
| MDM | What gets configured (policies, apps, config) | Intune / device manager |
| Provisioning service | How the device self-enrolls | Autopilot / Apple ABM / Android zero-touch |
| Device registration | Which devices are ours (hardware IDs) | OEM/reseller pre-registration |
Getting It Right
With the foundations in place, a handful of practices make automated provisioning fast, consistent, secure, and easy to run at scale.
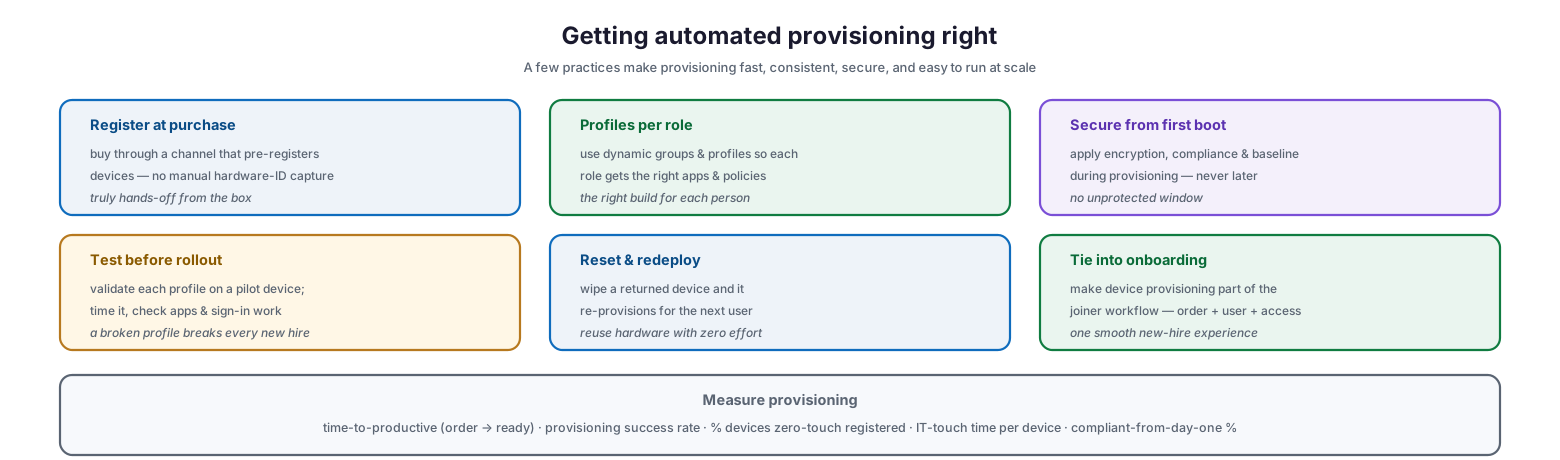
Getting automated provisioning right
Register at purchase — buy through a channel that pre-registers devices so there is no manual hardware-ID capture, making the process truly hands-off from the box. Use profiles per role — dynamic groups and provisioning profiles so each role receives the right apps and policies, giving the right build to each person. Secure from first boot — apply encryption, compliance, and the security baseline during provisioning rather than later, so there is never an unprotected window. Test before rollout — validate each profile on a pilot device, timing it and confirming apps and sign-in work, because a broken profile breaks every new hire, not just one. Reset and redeploy — wipe a returned device so it re-provisions for the next user, reusing hardware with zero effort. And tie into onboarding — make device provisioning part of the joiner workflow alongside ordering the device and creating the user and access, for one smooth new-hire experience. Measured by time-to-productive (from order to ready), provisioning success rate, the share of devices zero-touch registered, IT-touch time per device, and the percentage compliant from day one, automated provisioning becomes a demonstrable driver of efficient, secure onboarding.
Automated Provisioning Checklist
- Put the four building blocks in place: identity, MDM, a provisioning service, and device registration.
- Choose an MDM that manages all your platforms so one console covers the mixed fleet.
- Buy devices through channels that pre-register them (OEM/reseller) to eliminate manual hardware-ID capture.
- Use the right provisioning service per platform: Autopilot, Apple ADE, or Android zero-touch.
- Create provisioning profiles per role, driven by dynamic groups, so each user gets the right build.
- Apply encryption, compliance, and the security baseline during provisioning, not afterward.
- Test each profile on a pilot device before rolling it out; verify apps, sign-in, and timing.
- Integrate provisioning into the onboarding workflow with device ordering and account creation.
- Enable reset-and-redeploy so returned devices re-provision automatically for the next user.
- Ship devices directly to employees, sealed, with no IT touch.
- Document the process so it is repeatable and not dependent on one person.
- Measure time-to-productive, provisioning success rate, and day-one compliance.
Best Practices
Register at the source. The biggest efficiency gain comes from buying devices through a channel that pre-registers them, so they self-enroll straight from the box with no hardware-ID capture. This is what makes provisioning genuinely zero-touch.
Manage the whole fleet from one MDM. Use a single device manager that supports Windows, Apple, and Android so you learn and operate one provisioning model rather than three. The concept is identical across platforms; the console can be too.
Build profiles around roles. Different roles need different apps and settings. Use dynamic groups and role-based profiles so provisioning delivers exactly the right configuration to each person automatically.
Secure from the first second. Apply encryption, compliance policies, and the security baseline as part of provisioning, so a device is never in an unprotected state. Security applied later leaves a gap; security applied at provisioning does not.
Test on a pilot before you scale. A provisioning profile applies to every new device that uses it, so a flaw affects every new hire. Validate each profile end to end on a pilot device before it goes live.
Make it part of onboarding. The best experience treats device provisioning as one step in a joiner workflow that also creates the account, assigns access, and orders the hardware. Integrated onboarding is smooth for the employee and reliable for IT.
Common Mistakes
Sticking with manual imaging. Continuing to image devices by hand wastes hours per machine, delays onboarding, and cannot support a remote workforce. Zero-touch provisioning removes the bottleneck entirely.
Not pre-registering at purchase. Manually capturing hardware IDs for each device reintroduces IT touch and undermines the zero-touch benefit. Buy through channels that register devices automatically.
Treating platforms separately. Managing Windows, Apple, and Android provisioning as three unrelated projects multiplies effort. Use one MDM and one consistent model across the fleet.
Delaying security. Provisioning a device and applying security later leaves an unprotected window and risks non-compliant devices reaching data. Bake encryption, compliance, and baselines into provisioning.
Skipping the pilot test. Rolling out a provisioning profile without testing it means a mistake hits every new device. Always validate profiles on a pilot before they go live.
Forgetting reuse. Not enabling reset-and-redeploy means returned devices sit idle or get manually rebuilt. A wipe should re-provision the device automatically for the next user.
Frequently Asked Questions
What is automated device provisioning? It is a method — often called zero-touch provisioning — where a new device configures itself automatically when the employee first signs in, applying policies, apps, and security with no manual setup by IT. The device ships straight to the user and is ready in under an hour.
How is it different from imaging? Traditional imaging requires a technician to build and apply a golden image to each device by hand before shipping it to the user. Automated provisioning skips that entirely: the device self-configures on first sign-in, so IT never touches it.
Does zero-touch provisioning work on Macs and Android, not just Windows? Yes. Windows uses Autopilot, Apple uses Automated Device Enrollment through Apple Business Manager, and Android uses zero-touch or enterprise enrollment. All can be managed through a single MDM, so the same approach covers a mixed fleet.
What do we need to set it up? Four things: a cloud identity (like Entra ID), an MDM (like Intune), the provisioning service for each platform, and device registration — ideally with the OEM or reseller pre-registering devices at purchase so no manual hardware-ID capture is needed.
Can a device be re-provisioned for a new user? Yes. Wiping a returned device causes it to re-provision from scratch for the next user via the same zero-touch process, so hardware can be reused with essentially no manual effort.
How does provisioning fit with onboarding? Best practice is to integrate device provisioning into the joiner workflow alongside ordering the device, creating the user account, and assigning access. This gives new employees a smooth day-one experience and gives IT a reliable, repeatable process.
Conclusion
Automated device provisioning is the practice that finally frees IT from the slow, hands-on ritual of building every new machine by hand. By registering a device once and letting it configure itself on the employee’s first sign-in, zero-touch provisioning ships devices straight from the factory to the user and has them productive, compliant, and secured within the hour — anywhere in the world. It is not a Windows-only capability but a cross-platform discipline, with Autopilot, Apple Automated Device Enrollment, and Android zero-touch all delivering the same self-configuring experience through a shared MDM control plane.
Realizing that benefit takes deliberate groundwork: an identity system, an MDM, the right provisioning service per platform, and — most importantly — device registration handled at purchase so the process is truly hands-off from the box. Build role-based profiles, secure devices from the first boot, test before rolling out, enable reset-and-redeploy for reuse, and weave provisioning into the onboarding workflow. Do that, and equipping a new employee — remote or in-office, on any platform — becomes a fast, consistent, secure, and almost effortless step, rather than the days-long bottleneck it used to be.
References
- Windows Autopilot overview (Microsoft Learn)
- Device enrollment in Microsoft Intune
- Apple Business Manager and Automated Device Enrollment
- Enroll Apple devices in Intune (Automated Device Enrollment)
- Android Enterprise enrollment methods (Google)
- Android zero-touch enrollment
- NIST SP 800-124 — Guidelines for Managing the Security of Mobile Devices